Your water heater is one of the most essential appliances in your home, yet it’s often taken for granted until something goes wrong. Over time, water heaters accumulate sediment, particularly in areas with hard water, which can significantly reduce efficiency and performance. Sediment buildup insulates the heating element from the water, forcing the system to work harder, use more energy, and shorten its lifespan. Flushing your water heater regularly is a straightforward, cost-effective way to maintain optimal performance, extend the unit’s life, and lower energy costs.
This article will deconstruct the process of flushing a water heater from its fundamental principles, uncovering why it works, how sediment impacts performance, and the exact steps to follow. By the end, you’ll not only know how to perform this crucial maintenance task but understand its long-term impact on your home’s energy consumption and efficiency.
Why Flushing Your Water Heater is Essential: Understanding the Fundamentals
At its core, a water heater is designed to heat water by transferring energy (from electricity or gas) to the water within the tank. As cold water flows into the tank, minerals like calcium and magnesium naturally present in the water supply settle at the bottom. This is particularly true in regions with hard water, where mineral content is high.
The Sediment Problem
The sediment that collects over time forms a layer between the heating element and the water, essentially acting as an insulator. This means the heater has to work much harder to bring the water to the desired temperature. Not only does this reduce efficiency, but it can also lead to overheating, noisy operation, and premature failure of the system.
- Increased Energy Consumption: With sediment buildup, the system requires more energy to achieve the same output, leading to higher utility bills.
- Decreased Lifespan: Over time, the buildup can cause the heating element or the tank itself to wear down more quickly.
- Risk of Tank Failure: In extreme cases, the sediment can harden and even lead to cracks or leaks in the tank.
Flushing your water heater removes this buildup, restoring efficiency and helping to maintain optimal performance. It’s a preventative measure that can save you from costly repairs and even water damage caused by leaks or tank ruptures.
How Sediment Affects Water Heater Performance: A Deeper Look
Heat Transfer and Energy Loss
To understand why flushing your water heater is so important, we need to look at how heat is transferred in your system. The heating element at the bottom of the tank is designed to directly transfer heat to the water. As sediment builds up, it creates a barrier, which prevents this heat transfer from occurring efficiently. The more sediment, the thicker the barrier, and the more energy is wasted.
Over time, the water heater must run for longer periods to maintain the same level of heat, resulting in higher energy bills. This inefficiency compounds as the sediment continues to accumulate. Additionally, in gas-powered water heaters, sediment buildup can block the burner, causing uneven heating and even leading to potential gas leakage, a significant safety risk.
The Noise Factor: A Warning Sign
If your water heater is making unusual noises like popping or rumbling, it’s likely due to sediment buildup. When water gets trapped under layers of sediment, it becomes superheated and turns to steam, creating those loud noises. These noises are your water heater’s way of signaling that it’s time for a flush.
By removing the sediment, you’re reducing the strain on your water heater, lowering noise, and restoring it to peak performance. Regular flushing can prevent these issues, ensuring quiet and efficient operation.
Tools You’ll Need for Flushing Your Water Heater
Before you begin, gather the following tools:
- Garden hose: To drain the water out of the tank.
- Bucket: To catch any residual water during the process.
- Flathead screwdriver or wrench: Depending on your heater’s drain valve.
- Protective gloves and eyewear: Safety first, especially when handling hot water.
- Towels or rags: To clean up any accidental spills.
These are all common household tools, and no specialized equipment is necessary. If you don’t have a garden hose, they are inexpensive and can be found at any hardware store.
Step-by-Step Guide to Flushing Your Water Heater
Step 1: Turn Off the Power and Water Supply
For Electric Heaters
Go to your home’s circuit breaker and switch off the power to the water heater. This is crucial for safety to prevent electrical shocks during the process.
For Gas Heaters
Turn the gas valve to the “pilot” setting to stop the heating process while allowing the pilot light to remain on.
Next, turn off the cold water supply at the top of the water heater. This prevents new water from flowing into the tank during the flush.
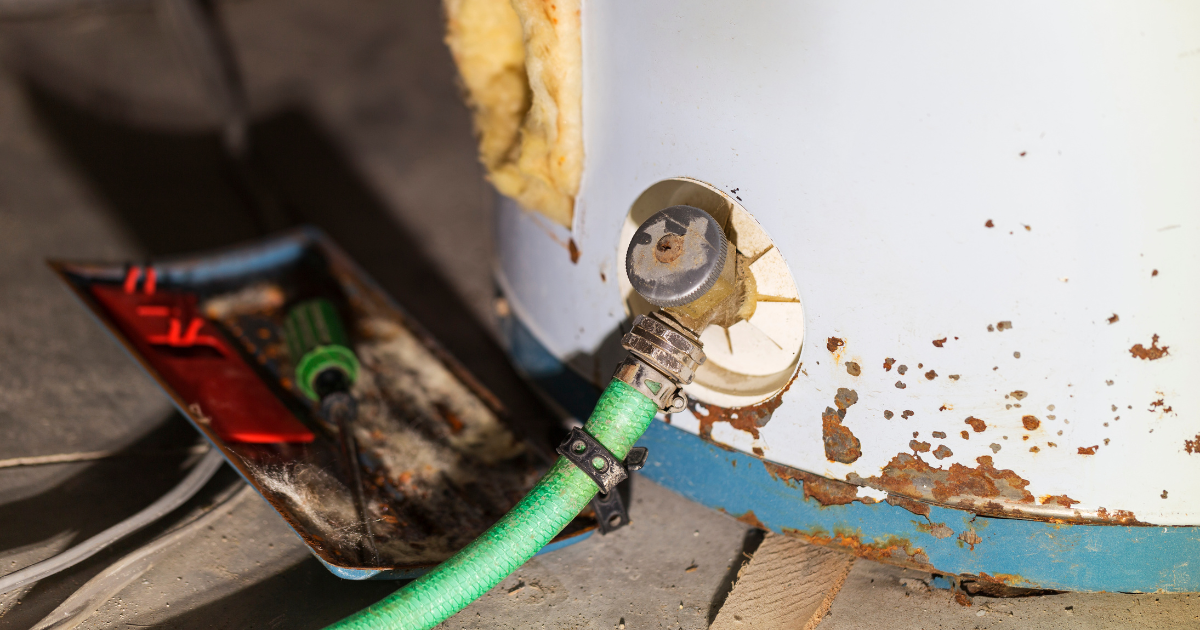
Step 2: Attach a Hose to the Drain Valve
Locate the drain valve at the bottom of your water heater. Attach a garden hose to the valve and direct the other end of the hose to a floor drain or outside. If your heater is located in a basement without floor drainage, you may need a bucket to collect the water, though this will require more frequent emptying.
Step 3: Drain the Water Heater
Open the drain valve to begin draining the tank. Allow the water to flow out, being cautious as it may be very hot. Opening a hot water faucet in your home (such as in the bathroom or kitchen) can help relieve pressure and allow the water to flow more smoothly from the tank.
Step 4: Flush the Tank
Once the tank is mostly drained, turn the cold water supply back on for a few minutes to stir up any remaining sediment at the bottom of the tank. Let the cold water flow out through the drain until it runs clear. This process may take a few minutes, but it’s crucial to ensure that all sediment is removed.
Step 5: Close the Valve and Refill the Tank
Once the water runs clear, close the drain valve and remove the garden hose. Turn the cold water supply back on, allowing the tank to fill. Make sure the hot water faucet you opened earlier is still on, as this will help air escape from the tank as it refills.
Step 6: Restore Power and Check for Leaks
Once the tank is full, turn the power back on for electric heaters or return the gas valve to its normal position for gas heaters. Check for leaks around the drain valve and make sure the water heater is functioning properly.
How Often Should You Flush Your Water Heater?
The frequency of flushing depends largely on your local water quality. For homes with hard water, flushing every six months is recommended. In areas with soft water, an annual flush may be sufficient.
- Hard Water Areas: High mineral content accelerates sediment buildup, which means more frequent maintenance is needed.
- Soft Water Areas: Less frequent maintenance is required, but annual flushing still ensures optimal performance and longevity.
In addition to sediment buildup, factors like household size and hot water demand may affect how often you should flush your water heater. Larger households or heavy usage may require more frequent flushing.
The Long-Term Benefits of Regular Flushing
Flushing your water heater regularly doesn’t just restore its performance in the short term—it can also have a significant impact on the overall lifespan of the appliance and its efficiency over time.
Improved Energy Efficiency
As discussed, sediment buildup forces your water heater to work harder, consuming more energy. By flushing the tank, you restore its ability to heat water efficiently, which can result in noticeable savings on your energy bills.
Extended Lifespan
By maintaining your water heater and flushing out sediment, you prevent the kinds of wear and tear that lead to early failure. Regular maintenance can help extend the life of your unit by several years, delaying the need for an expensive replacement.
Reduced Risk of Failure
A neglected water heater is more likely to fail unexpectedly, whether through leaks, overheating, or a complete system breakdown. Regular flushing helps prevent these issues by keeping the tank clean and the system functioning smoothly.
Troubleshooting Common Flushing Issues
Even though flushing is a straightforward process, a few issues can arise:
What If My Water Heater Won’t Drain?
If the tank doesn’t drain properly, it could be due to sediment clogging the drain valve. In this case, try gently poking a long screwdriver or wire into the valve to dislodge the sediment.
What If My Water Is Still Discolored?
If your water remains cloudy or rusty after flushing, it may be a sign of severe corrosion in the tank. This likely means it’s time to consider replacing the water heater.
Conclusion: A Simple Task with Big Benefits
Flushing your water heater is a simple yet highly effective way to maintain its performance, increase energy efficiency, and extend its lifespan. By taking this small step, you’re ensuring that your system continues to provide reliable hot water, while also saving on energy costs and avoiding future repairs.
If you’re noticing reduced performance, higher energy bills, or unusual noises, it might be time to flush your water heater. Performing this maintenance task just once a year can make a significant difference, ensuring that your water heater runs efficiently for years to come.
FAQ Section
How long does it take to flush a water heater?
The entire process usually takes 30 minutes to 1 hour, depending on the size of the tank and the level of sediment buildup.
Is it safe to flush a water heater yourself?
Yes, as long as you follow proper safety precautions, such as turning off the power or gas supply and wearing protective gear.
How often should I flush my water heater?
For homes with hard water, every 6months is recommended. For areas with soft water, once a year is generally sufficient.
Can flushing my water heater improve its lifespan?
Yes, regularly flushing your water heater removes sediment buildup, which can reduce strain on the system and help prevent premature failure, extending its lifespan by several years.


